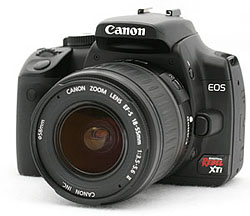
Canon EOS 400D Digital Rebel XTi Introduction
Though it was still the hottest selling digital SLR on the market, the Canon Digital Rebel XT was due for an upgrade, and right on the expected 18 month schedule comes the EOS Digital Rebel XTi (called the EOS 400D overseas). The new Rebel XTi has a 10.1 megapixel sensor, a 2.5 inch LCD screen, and a new dust cleaning system; and like its EOS brothers, the Rebel XTi will work with a vast system of over 50 lenses and a wide array of accessories. It borrows a lot of other recent innovations from recent EOS cameras, including PictBridge printing enhancements, Picture Styles mode settings, and it and comes in at $100 less than its predecessor. More importantly, the Rebel XT maintains the high image quality we've come to expect from Canon's SLRs, from the Rebels to the 1D-series.
Improvements include:
- 10.1 megapixel sensor
- EOS Integrated Cleaning System
- 2.5 inch, 230,000 pixel LCD with 160 degree viewing angle
- Improved interface
- Better grip
- Greater buffer depth of 27 Large/Fine JPEGs or 10 RAW frames
- Folders that will hold up to 9,999 images
- Picture Style settings for quick color mode changes
- More precise 9-point AF system
- Faster image processing
- Improved Print/Share functions
- Photo editing functions plus index print options
- Custom auto-rotation
For a detailed report prepared on the day of the Rebel XTi's announcement, click on the Improvements tab above.
Canon Rebel XTi User Report
by Shawn Barnett
Posted: 09/01/2006
Updated: 11/30/2006
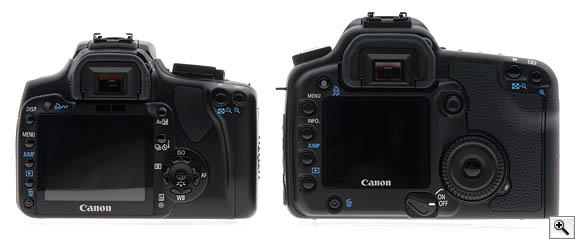
 Similar in weight and size, much of the user experience with the Canon Rebel XTi is like the Rebel XT. They're both small digital SLRs with good heft and a solid feel. But there's more to like about the XTi, from the finish to the fit to the interface.
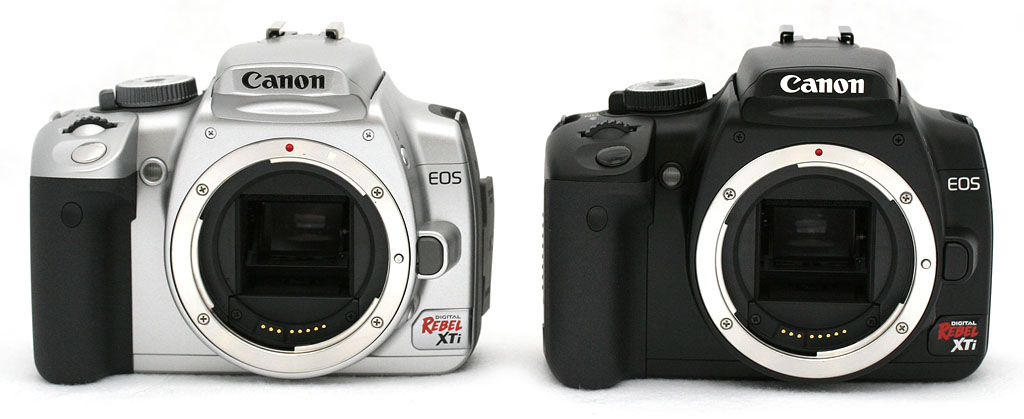
We were fortunate to see both the black and silver models this time around. I'm not fond of the silver on either the Rebel XT or XTi, though I didn't much mind the silver on the original Digital Rebel. Both black and silver finishes have been changed from the XT. The black finish is smoother and more of a satin black. It gives an impression of painted metal rather than bare plastic, as the Rebel XT's finish did. The XT tended to collect what looked like scratches on its surface, but they were very often fingernail dust, abraded from my nails when they rubbed against the paint. Most conspicuous were the marks between the grip and lens, where my fingers are still too often pinched as I wrap my hand around the grip. It was just rough, tough paint they used on the XT's body. The paint on the Rebel XTi is smoother and makes the camera look metal rather than plastic.
The silver paint, which I think they call "chrome" is a brighter silver, also more metallic looking. It looks garish to my eye, but I'm sure many will like it. Like Canon's legendary white lenses, the silver body should tend to get a little less hot in direct sunlight.
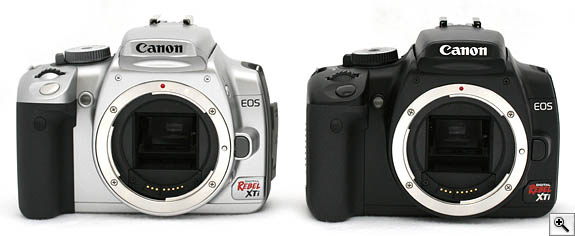

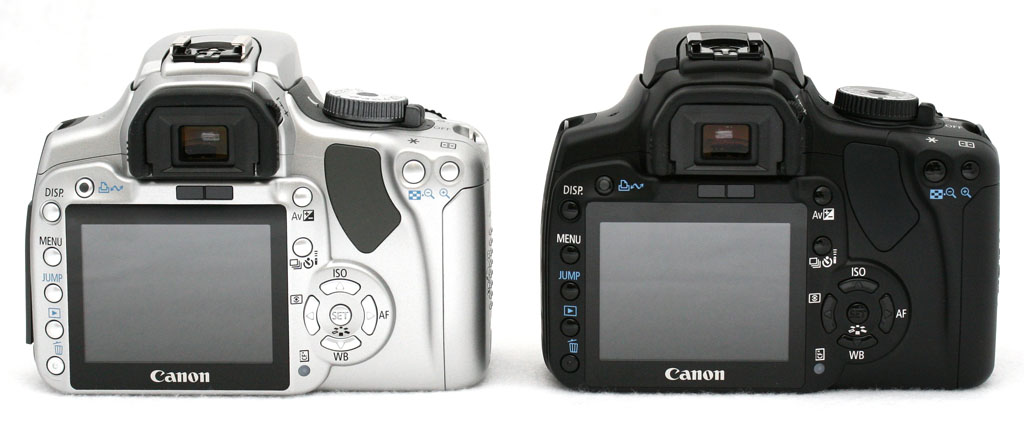
Chrome and black: Though some black accents remain on the Chrome version, many of them have been changed to a dark gray. On the Black version, all buttons are now black, including the shutter and nav buttons, to give the black Rebel XTi a more professional look.
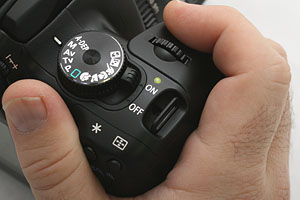
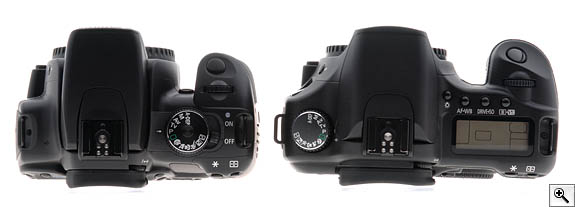
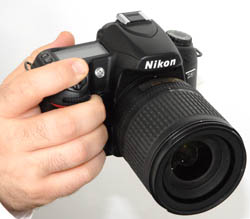
Improved grip. While I like the slight size increase in the grip, it's still not enough. The top deck is nearly the same, except for the addition of the green LED to indicate power status.
Grip. I'd have preferred a more dramatic increase in grip size, but I'm glad for the improvements that were made. For his part, Dave expressed vehement hatred of the Rebel XT's grip, but he was more pleased than I was with the subtle changes we both perceived in the XTi's grip. The changes aren't easily seen; it's more the hand that notices a change. First, there's more of a coarse texture to the grip surface. It also appears that they rounded the front slightly, where your two middle fingers rest, giving perhaps a millimeter or two of rise; then they re-tapered the grip's shape to have slightly more fullness left to right, with just a little more material rounding out toward the right. What I don't like is that where the Rebel XT's grip met the camera body (the side toward the lens) at a stronger right angle, the Rebel XTi's grip is more rounded, preventing me from wedging my fingertips into the corner. Pentax recently made the opposite change in their redesign of the *istDL to the K100D, and I prefer it. My standard form of carry is either up by the chest holding the lens in my right or left hand, or down to the side with my hand around the grip. I use straps only very occasionally, and I hate them the whole time, so a camera's grip is very important to me.
The thumb grip is better. Rather than a single bulge in the upper right corner, there's a nice tapering curve that supports the heel of your thumb as well as a rubber pad for your thumb to grip. Note also the black navigation buttons and more practical knurl on the mode dial.
Overall, I'd say the Rebel XTi's grip is improved. I still have to curl my pinky finger under the battery compartment, because the grip isn't tall enough. Even my wife, who liked the XT's grip, wasn't as enthusiastic this time. She liked how light the camera was, but not the inside of the grip, nor that her pinkie finger had to curl around the bottom to allow her index finger enough room to rest on the shutter. The 30D grip felt more sturdy to her. "I think I'd get tired holding the XTi all day," she said. It's probably a non-issue if you use a camera strap, though, as most do.
Attaching the BG-E3 battery grip extends the length of the gripping surface, making a world of difference. Even without the BG-E3, the front grip is enhanced by an improvement in the thumb grip on the back. Both the Rebel XT and the 30D have a single large bulge in the top right corner that gives a decent counter to the front grip. The Rebel XTi adds a smooth curving ridge that runs down from this bulge, adding extra support and some sense of comfort. There's also a soft rubber pad right where the thumb needs it most, making for extra traction. Despite my quibbles, the combination of minor enhancements does make for a more secure and comfortable hold so you can focus on getting a great shot.
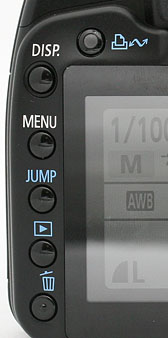
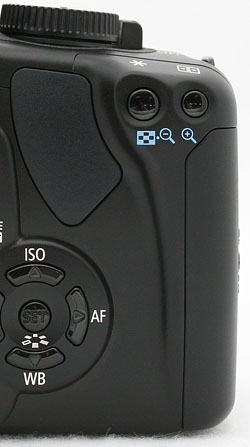
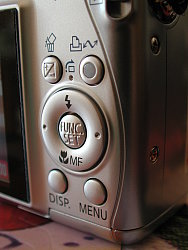
Smaller buttons. They're smaller, round again, and the Print/Share button has been added. Menu and INFO buttons have been swapped too, and INFO is now called DISP, because it also turns off the Status Display. As one used to shooting with a 20D and 30D, this move is a bit distracting.
The Rebel XTi's larger screen has dictated a few changes to buttons, with the five left buttons shrinking again to small round buttons instead of the larger reverse-D shaped buttons of the Rebel XT. These new buttons have a soft, but detectable click. Since there's no longer a monochrome status display, the LCD illumination button is gone.
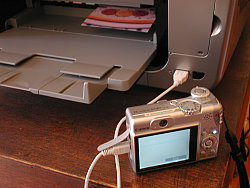
Upper left of the Rebel XTi's 2.5 inch LCD is something that surprisingly wasn't included on the Rebel XT: the now almost ubiquitous Print/Share button. First introduced on Canon's digicams, the first SLR to receive this feature was the over-$3,000 Canon EOS 5D. The button glows blue when connected to a compatible printer or computer via a USB connection, meaning you can begin printing or transferring images right away. It took a little time for my computer (an iMac G5) to wake up and get all the pieces in place for the first time, but after that it worked just fine, and transferred images very quickly via the USB 2.0 connection.
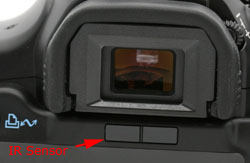
Screen dimmer. An IR emitter and sensor shuts the Status display off.
Just above the LCD and below the optical viewfinder are the IR emitter and sensor that detect the presence of your eye or other object (such as your stomach if you have the camera on a strap). This tells the camera that the monitor no longer needs to be on, and prevents glare from interfering with the light coming through the viewfinder. It does not start up the autofocus system as we've seen on the Sony A100; Canon has opted to leave that job to the shutter button. The advantage to that decision is that while you move the camera around, you won't be turning the AF system off and on repeatedly, which can wear on the battery.
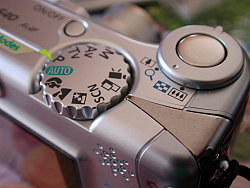
External tweaks. There are other changes that are mostly cosmetic, like the larger Canon logo on the front of the camera, and a slightly redesigned mode dial on top. The latter looks more machined on top and has a slightly more useful knurl around the outside. The shutter button is also black instead of silver on the black model, to more closely resemble the rest of the black body EOS models. The five-way navigator buttons on the back are also black on the black body. The corresponding items on the silver body are now silver, and many of the accents (the mode dial and power switch, the rubber thumb rest, the left side panel and its rubber door, and the lens release button) are dark gray.
The design of the Rebel XTi is very similar to the XT, but its lines are slightly more organic, looking more mature and sturdy. Those few enhancements noted above, along with the better paint make the Rebel XTi look more professional.
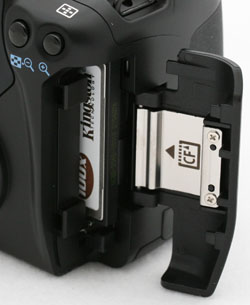
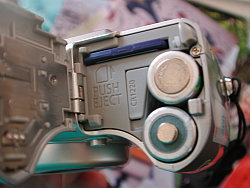
Still CF. Existing Canon EOS owners can sigh with relief that their existing collection of cards will still work in the Rebel XTi.
Staying standard. With most other recent consumer SLRs switching to SD cards, I fully expected Canon to follow suit by switching to SD in the Rebel XTi, but I was pleased to see a nice big CF door in place. It appears nearly identical to the Rebel XT; perhaps a little longer due to the new rear grip addition, but functionally the same. In general, you're still able to buy larger cards for CompactFlash because the card format is larger and can fit more chips for less money. I'd prefer the choice of both, for users with different needs, but that adds money to the bottom line; and remains a feature of the far more expensive Canon 1D-series.

Firing it up. Wrapping my hand around the improved grip, the hold is sturdier. I can use my index finger to reach back across the top deck and flip the camera on. It's a little less comfortable than on the Olympus E-500, but still quite possible. The green lamp on top flashes to life, as does the LCD on the back. The gray status display comes on, showing the current settings. In the lower right corner, a little rectangle appears with animated sparkles for a second, then the estimated number of frames available on the card appears (when you turn the camera off, a black screen comes up with the same animated sparkles as shown at right). I can bypass the cleaning process if I'm in a hurry by half-pressing the shutter button; otherwise, it takes about a second to complete the cleaning process. I noticed no sound while cleaning initially, but since I've had an opportunity to try it in a quieter room, I do hear a series of pulses, then a high-pitched ringing sound. It's not really distracting, though, and you have to listen for it. (For more on Canon's impressive new sensor cleaning and dust reduction system, see our expanded explanation under the Optics tab.)
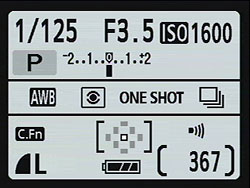
Simple, informative. The new Status Display is perhaps not as pretty as others we've seen, but it's informative and minimalist. Note also the three-stage battery icon.
Bigger LCD. The Canon Rebel XTi joins the lion's share of current digital SLRs with its larger, brighter 2.5 inch LCD with 230,000 pixels. Its viewing angle is 160 degrees, to help you show off your images to more people than the XT allowed. Like many other consumer SLRs, the Rebel XTi's color LCD stays on to serve as status display. It uses more battery, but the new Status Display is a lot better than the old monochrome LCD, mostly because there's more room to display the camera's many potential settings. On the XT, you had to look through the viewfinder to set the AF point, or use the cryptic number display on the monochrome LCD; but with the XTi, you need only press the AF point selector button, look at the back of the LCD -- or through the viewfinder -- and use the four-way nav buttons to select your AF points. At rest, you can double check the setting just by glancing at the Status Display again, where it is permanently displayed.
Other EOS cameras with a top Status Display require you to press a button, tilt the camera toward you, and turn the dial to make your changes (or look through the viewfinder). On both the old XT and the new XTi, all the buttons are on the back with the display, and most items can be changed with the Five-way Navigation buttons. The simple, clean gray and purple screens that come up to change common items like ISO and AF Mode are unimpressive at first, but once you use them a few times, the advantage of such a minimalist approach is clear, because all you see is what you're after.
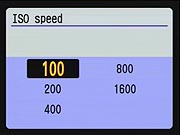
If you want to change the ISO, all you see are options for ISO, no menus, no icons to tell you how to navigate from here, just the words and numbers necessary. Use the arrow buttons to select among them, or the Main dial, and either press the Set button in the middle of the four arrows, or press the shutter button to go back to capture mode. The chosen item is selected, and shows up on the Status Display, regardless whether you press the Set button. Note that here you can scroll upward through the list by pressing the up arrow repeatedly, or use any of the other arrow keys to move around in the list: moving from ISO 100 to 800, for example, rather than scrolling through the others.
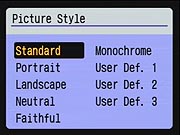
I especially appreciated having the Picture Style menu so close at hand. A press of the Set button brings it up, and you can make changes very quickly. If shooting in Standard mode, all settings are just four button presses away. I was a little disappointed, however, to find that unlike in the ISO menu, you cannot move from Standard to Monochrome by pressing on the right arrow. You have to scroll up or down, or roll the Main dial through all the intervening items to get where you want. As I say, it's only four or five moves in either direction to get to Monochrome, but it's a significant difference in how this menu works, when it looks just like the ISO menu above.
The battery icon has been improved a little, adding an additional stage to the formerly inadequate 2-stage battery icon of other EOS cameras. You could say it was a three stage icon, but flashing an empty battery outline to indicate empty is too little too late. It's good to have a little more advance warning with an additional bar.

Most valuable. Here's my top choice for the greatest improvement in the Rebel XTi: the AF sensor borrowed from the 30D.
New AF module. It doesn't stand out quite as much as the higher resolution and the anti-dust system, but the Rebel XTi's AF sensor upgrade is significant, because it's the same sensor used in the 20D and 30D. Shortly after completing the Rebel XT review, I spent a lot of time with it, comparing it to the Canon EOS 20D in all kinds of shooting situations. It became clear that the 20D was significantly faster in low light than the XT or the original Digital Rebel. It wasn't just the 9-points of the 20D vs the 7-points of the XT, it was just far better at analyzing a scene and deciding where to focus.
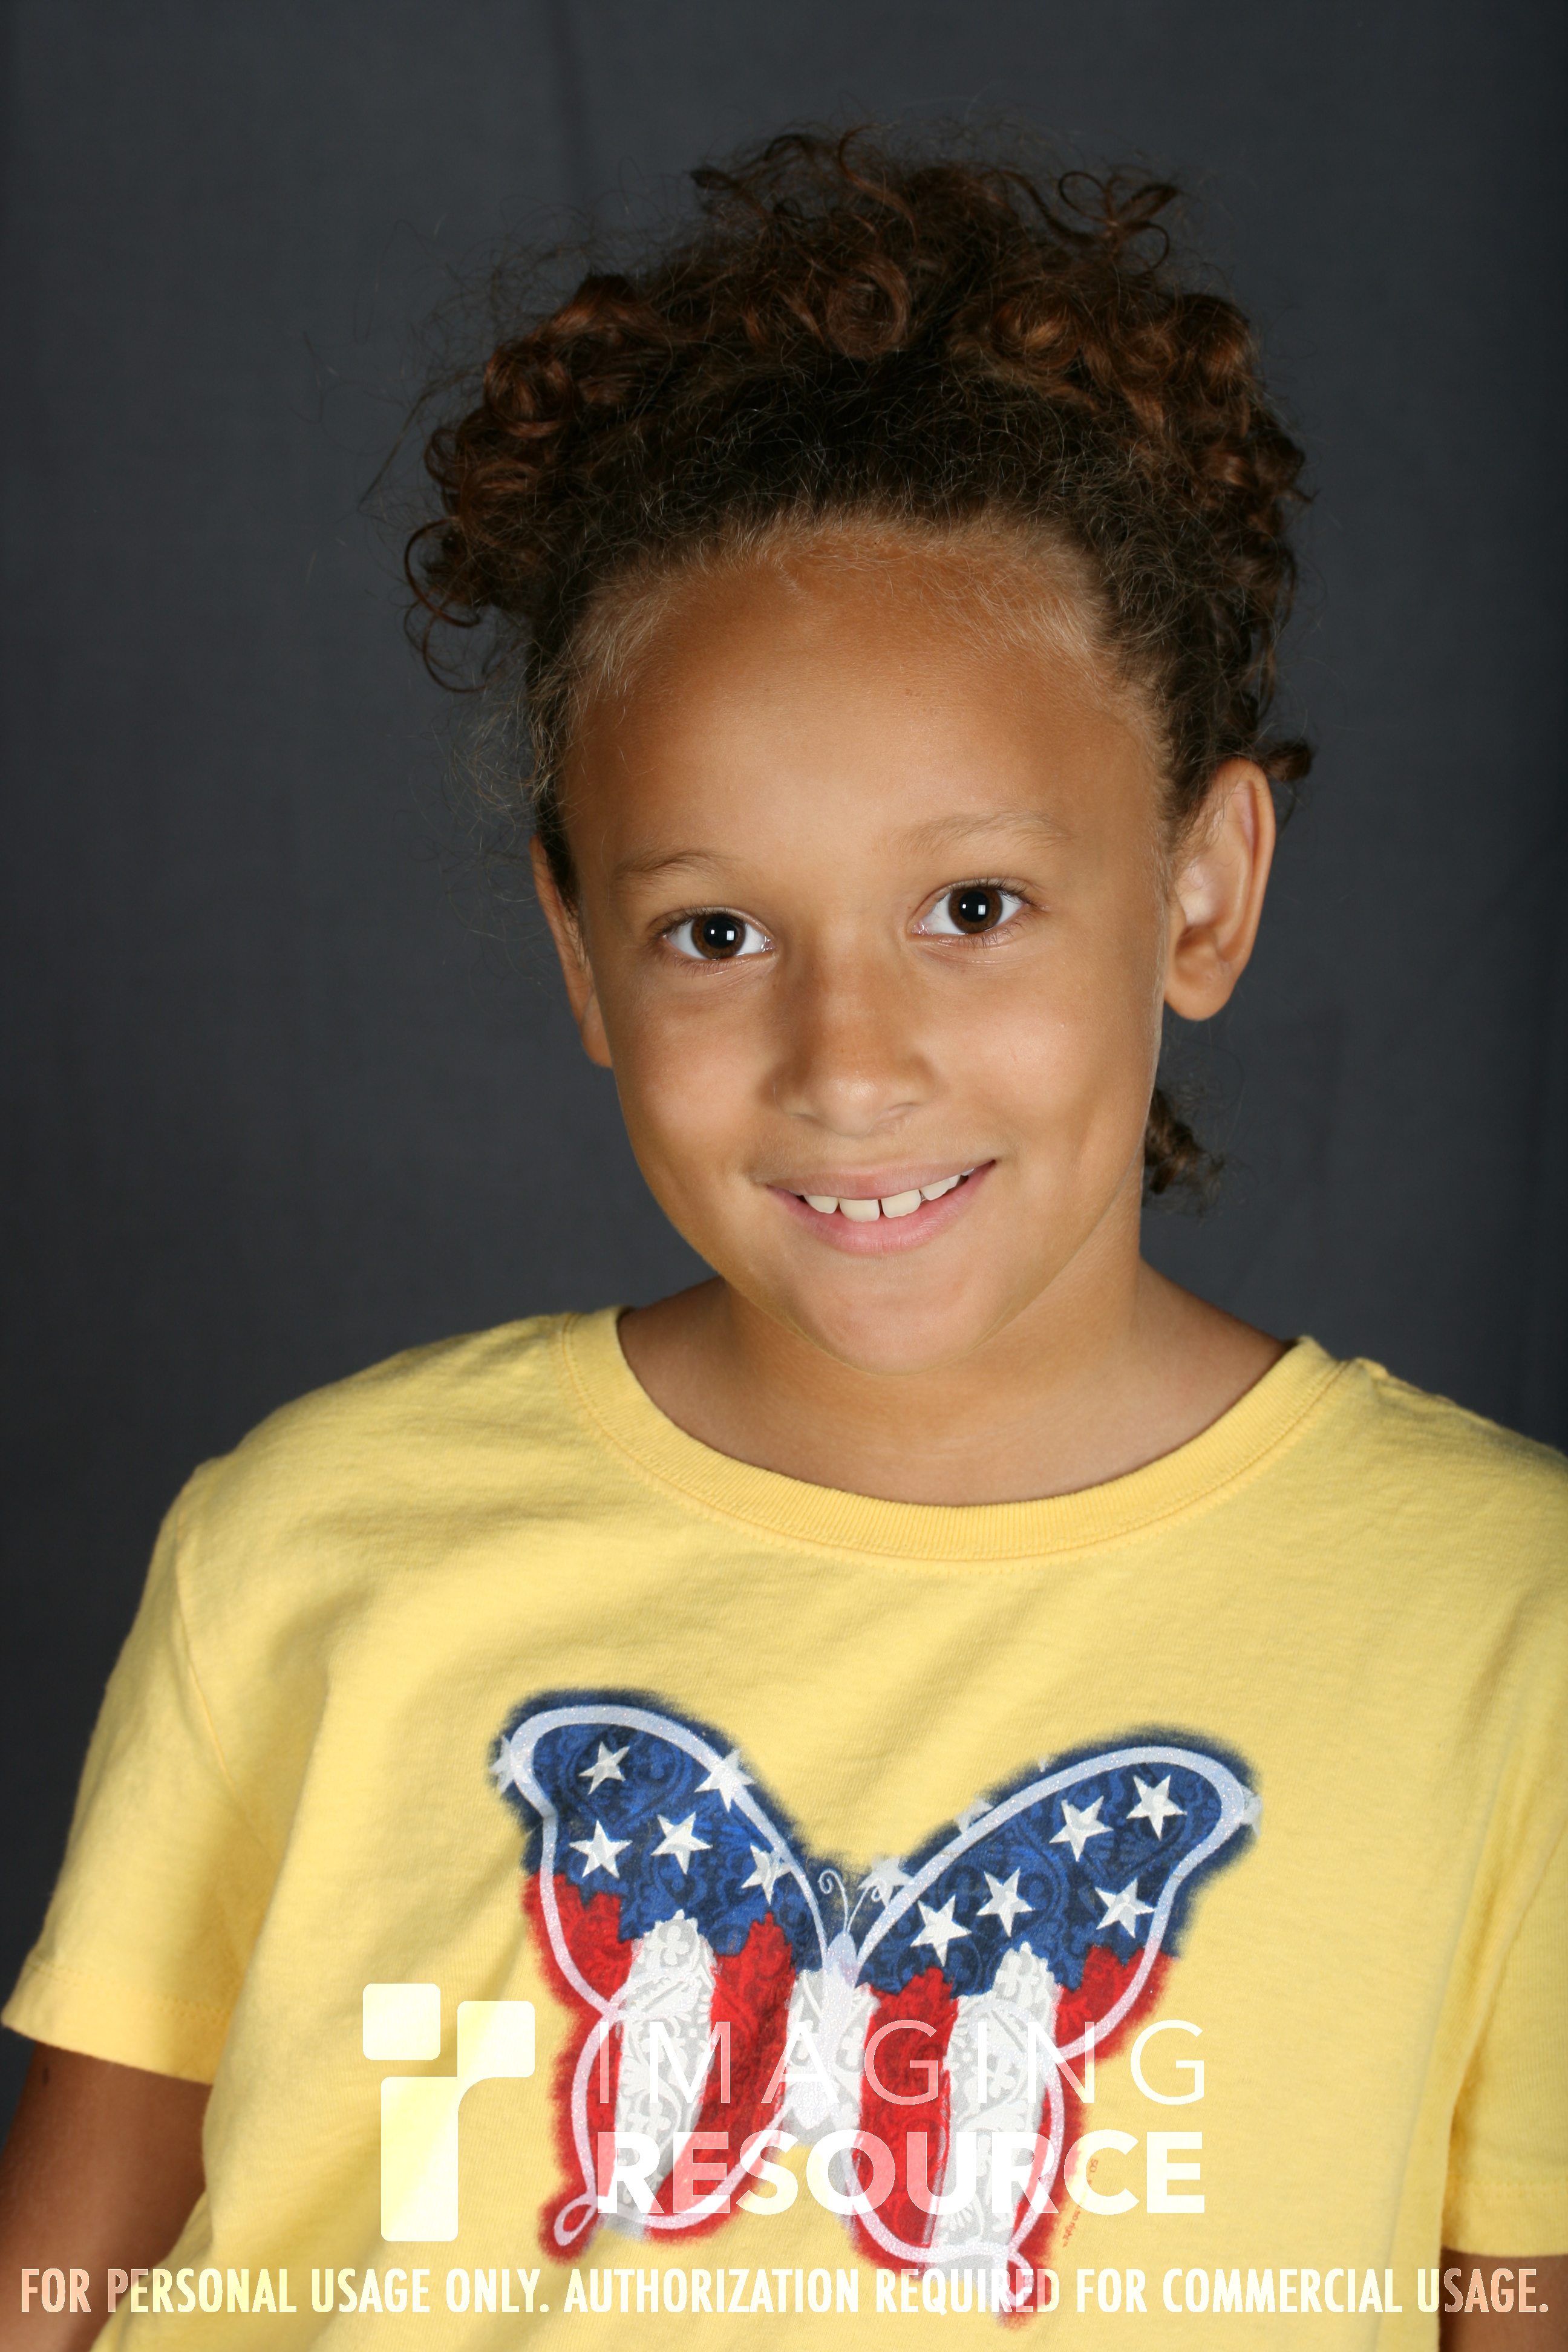
As a torture test, I grabbed both cameras and asked my son to run around in a lamp-lit room while I tried to snap his picture. The XT hardly got a shot off, compared to the 20D which more often than not locked and fired time after time. I've done the same test with other digital SLRs, and the Rebel XT beats them--but the 20D was even better. My tests with the shipping version indicate that the Rebel XTi is roughly equal to the 30D in low light.
Anyone looking at a digital SLR to take pictures of the kids at play or sport needs to know how important good low-light AF performance is to a good experience, since a good many sports are done indoors in low light, or at night, and the players are moving at high speed. Though it's still very difficult to get good sports shots with any camera, you're more likely to get something good if you start with a camera like the Canon Rebel XTi.
The Rebel XTi's viewfinder does not have the flashing red boxes that the 30D does; instead it has small red dots that light up in the middle of the boxes. Depending on the background, sometimes one is better than another, but I think both of these Canon AF indicators are easier to see in more lighting situations than most other solutions on the market.
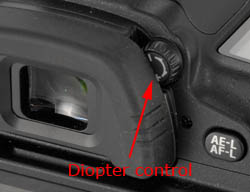
Viewfinder. Okay, so now I've turned the Rebel XTi on and checked the settings. Now I hold it up to my eye and the IR sensor turns off the display. I haven't tested it yet, but apparently sunglasses could keep the sensor from seeing its signal returned. Of course, glare from the sensor is unlikely to bother you much if you're in light bright enough that you're wearing sunglasses. According to the remarkably complete white paper on the Rebel XTi, some fluorescent lamps could also turn off the monitor if placed too close to the source. So don't do that.
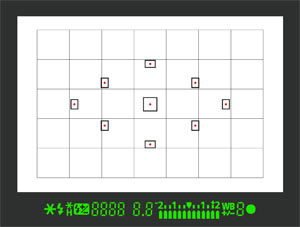
What you see & don't. You'll see everything but the grid shown here when you look through the viewfinder. The grid shows a layout of the Rebel XTi's 30 metering zones and does not (unfortunately) appear.
Peering through the viewfinder, it's a little disappointing that the magnification hasn't been improved as we've seen on the Nikon D200 and D80. Greater magnification is just more comfortable, and easier to verify focus. That hasn't stopped me from getting great shots with the existing magnification, however, so take it for what it's worth. AF points are arrayed in a diamond pattern, which Canon says helps improve subject tracking. My son has demonstrated that. The LED numbers for Shutter Speed and Aperture seem a little larger, and there are two new icons, a Flash Exposure lock indicator and a White Balance adjustment indicator. With my glasses on, the viewfinder picture is not quite complete, with vignetting around the corners. I have to press my glasses close to my face and up against the rubber guard to see the full frame.
If I'm in manual mode, I can adjust Shutter speed with the Main dial behind the shutter button, and press the Av button to adjust aperture, all without taking my eye from the viewfinder. The little arrow beneath the exposure level indicator responds to show levels like an old match needle. Pretty simple, and a very common method employed on this range of digital SLRs. This one puts my thumb right up against my cheekbone, but it's not bad. Slightly higher-end cameras have two wheels to control both variables in manual mode, but these lower-end cameras save a little on the bill of materials by assuming that most users will use one of the full- or semi-automatic modes.
Squeeze. With everything set, I half-press the shutter and the Rebel XTi tells me which AF points it's selected. If I don't like the selection, I can press again, and it will very often choose another set of points. This actually works very well most of the time, but when I'm doing important work, or facing an odd lighting situation, I switch to the center AF point on almost every camera. If I'm feeling lazy, I just keep hitting that shutter button until I'm satisfied.
Then I slowly squeeze the shutter button all the way down. The shutter sound is pretty well identical to the Rebel XT. A snap with a winding noise. It's not film that's being wound (obviously), just the shutter spring being reset by a small motor. Luke (our test wizard here at Imaging Resource) thinks I'm nuts, but I still suspect that they chose this winding motor on purpose, because that's what people expect SLRs to sound like (ever notice in the movies that even the smallest point and shoot camera sounds like it has a big professional motor drive?). The original Digital Rebel and EOS 20D didn't make this sound--at least not loudly--nor did the EOS 1D, but the Rebel XT and 1D Mark II certainly made quite the whirring sound. The XTi still has it.
When in AI Servo autofocus mode, the Rebel XTi doesn't need to lock focus like the XT and 20D did before the shutter will fire. Just press it all the way and it will capture whatever it sees. Another feature that appeared on the 30D is that the shutter button no longer needs to be released completely to make a follow-up shot. With the 20D and Rebel XT, you had to release the shutter button completely and the camera went through another AF cycle before the shutter could be released again. With the XTi, you can keep shooting more rapidly if you're satisfied that the focus is just fine. You just release the shutter halfway rather than all the way, and press again to capture subtle nuances in a scene.
Playback's enriched. A few enhancements to the Canon Rebel XTi and EOS 30D are good enough that they're worth the upgrade from the perfectly decent Rebel XT and EOS 20D models. One is a special auto-rotation mode. I hate auto rotation. You have this big rectangular screen that matches the orientation of the sensor, and you're going to rotate the image on the camera so that it's smaller and harder to see? I'd rather just turn the camera; after all, it wasn't hard to turn the camera when I captured the vertical shot, so I can easily do it again to view it. On the other hand, if I've taken a lot of shots, hand-rotating the vertical ones when I copy them to a computer is a bit of a pain. The Rebel XTi will let you have the best of both. Auto rotate can either rotate the images on the camera and the computer, or leave them as captured on the camera and rotate them on the computer. That time savings alone is worth the upgrade if you take enough pictures.
It's important to note that the new Auto Rotation works well if you use Canon's software, but many applications can get confused and rotate the image again. For my own sanity, I've opted to leave Auto Rotation off when I shoot with the Rebel XTi.
Another feature to come over from the 30D and higher cameras is the option of displaying either luminance or RGB histograms. The latter can often reveal an error in white balance if all three colors do not seem to be balanced across the histogram's range.
Finally, because the Rebel XTi's display is on while the camera's on, the name of the INFO button has been changed to DISP, for Display. The difference is that INFO regulated the amount of information that showed up primarily in playback mode, but the Display button can also turn the Status Display off to save battery when you still want to keep the camera's power switch on and the camera ready.
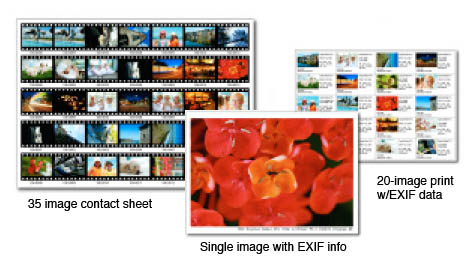 Print/Share button. The ability to print out a contact sheet, complete with mock film edges, directly from the camera will sell a lot of portable printers and PictBridge printers in general. When it's important, I prefer to print from within Photoshop, but sometimes it's nice to just plug into a PictBridge printer and toss out a few 4x6s. Among the possible in-camera improvements that you can apply before printing is the all-important red-eye reduction.
The XTi offers an expanded feature set that matches or exceeds the capabilities of the 30D. Here's a list of the printing capabilities added since the Rebel XT:
- 35-image "contact sheet" index printing
- Single-image prints with EXIF shooting information
- 20 image contact sheets with EXIF data
- Red-eye reduction function
- Face brightening correction function
- Additional supported paper sizes (4 x 8", 10 x 12", 8 x 10", 14 x 17")
- Improved printing effects (Natural, Natural M, B/W, Cool Tone, and Warm Tone added)
- Adjustment of printing parameters
- Addition of supported paper (Fine Art, Photo Rag, Super Photo paper)
Improved buffer depth. The Rebel XTi can also shoot more pictures than its predecessor in continuous mode. I picked a simple photograph hanging on a beige wall and managed to fire off 34 shots in Large Fine JPEG mode. That's more than they're stating, and we're pretty sure we have a target or two that could make the Rebel XTi capture fewer than the 27 Canon-estimated shots before the buffer is filled. But they're rightly quoting an average, since the size of a JPEG shot can vary widely based on the relative compressibility of the subject. Since RAW files are also losslessly compressed, their sizes vary too, but it seems to stick more closely to 10 frames to fill the buffer in my informal shooting (our test results show it at between 9 and 12 frames).
Battery. The XTi's battery is the same as the XT's, the NB-2LH, but because of the larger display, its function as a Status display, and the new self-cleaning system, battery life is reduced. You can expect 500 images at room temperature (without flash) and 360 shots with 50% flash usage. At freezing temperatures, that expectation goes down to a still-respectable 370 and 280 shots without and with flash.
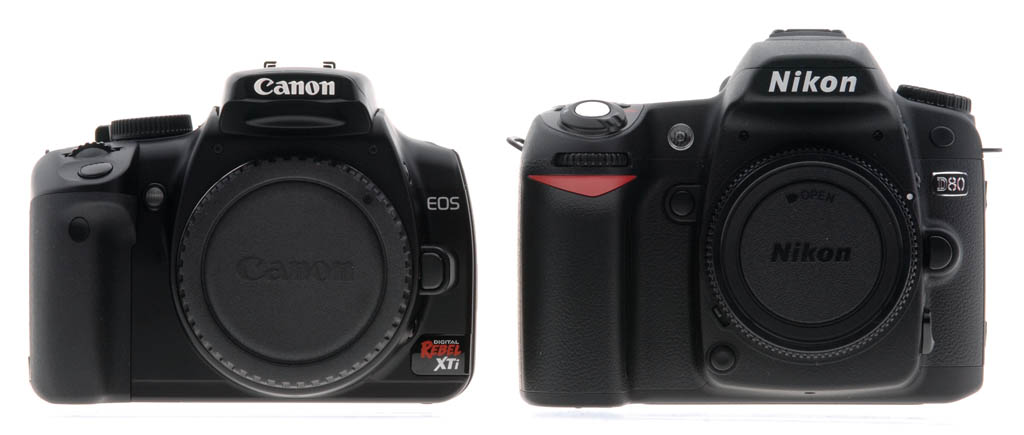
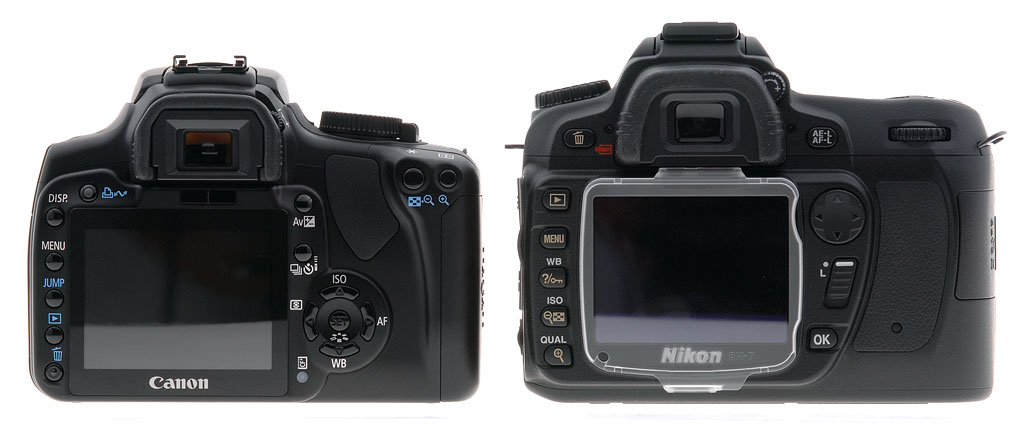
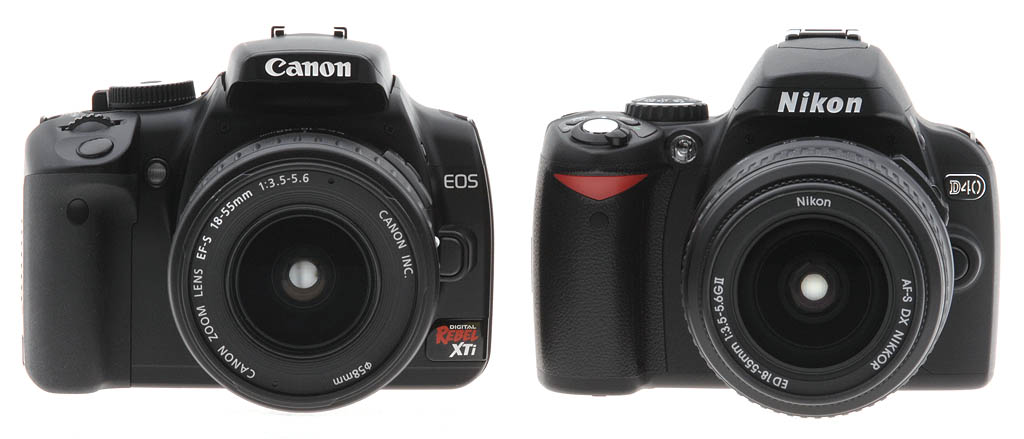
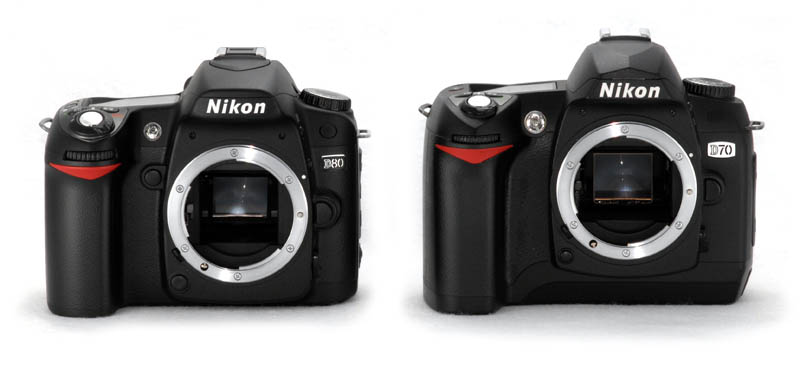
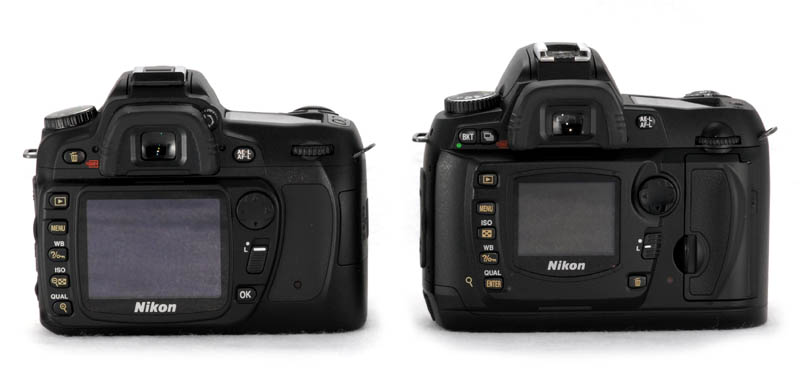
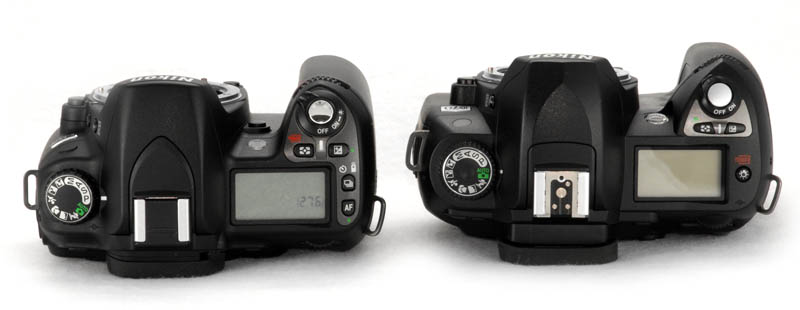
Competition. The Rebel XTi's obvious competition is the Canon 30D, the Nikon D80, and the Nikon D40. Sure, the Olympus E-500, Sony A100, and Pentax K100D are also contenders, but those comparisons are for a separate article. Since many XTi shoppers will be comparing the camera to the Nikon D40, Nikon D80, and Canon EOS 30D, I've snapped some images of the XTi next to all three so you can get an idea of the size differences. For the record, I do prefer the D80 and 30D grips, but that might not be a huge consideration for you if you plan to use a camera strap to carry the camera.
Size comparisons: Canon EOS Digital Rebel XTi vs Nikon D80
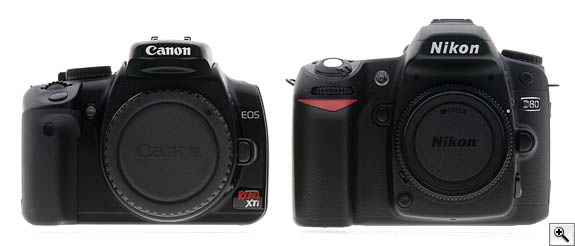
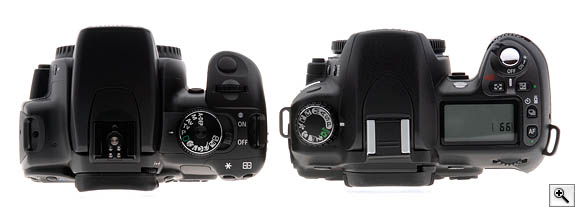
Quite small: While the Nikon D80 is quite a bit smaller than its predecessor, the Nikon D70, the Canon Rebel XTi is smaller still.
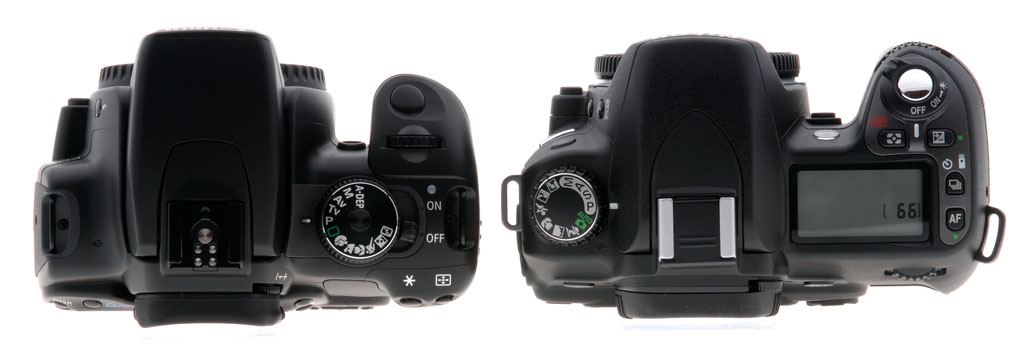
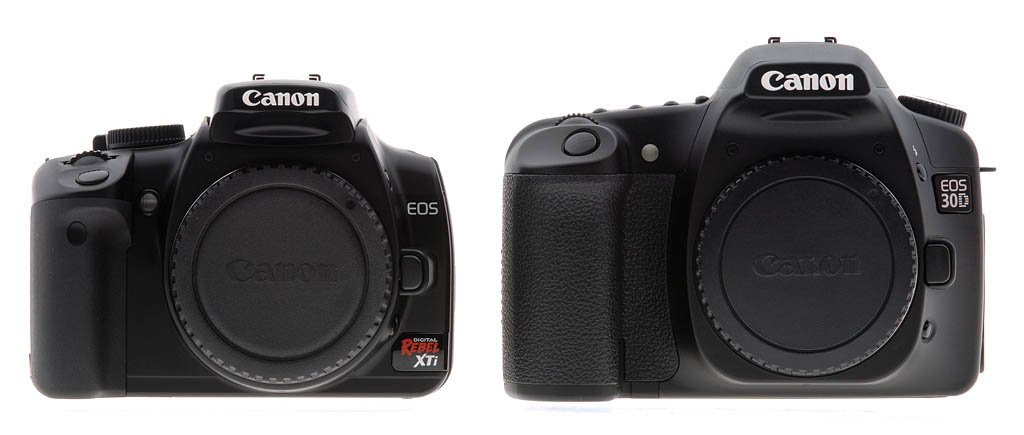
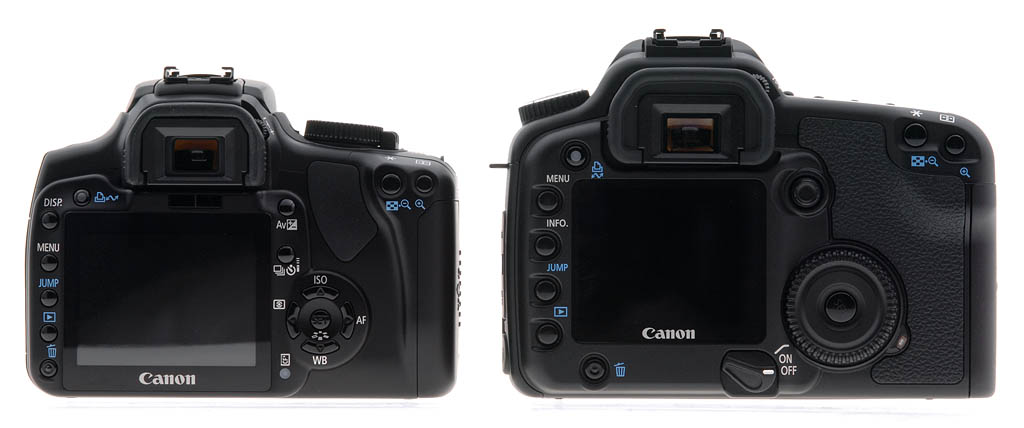
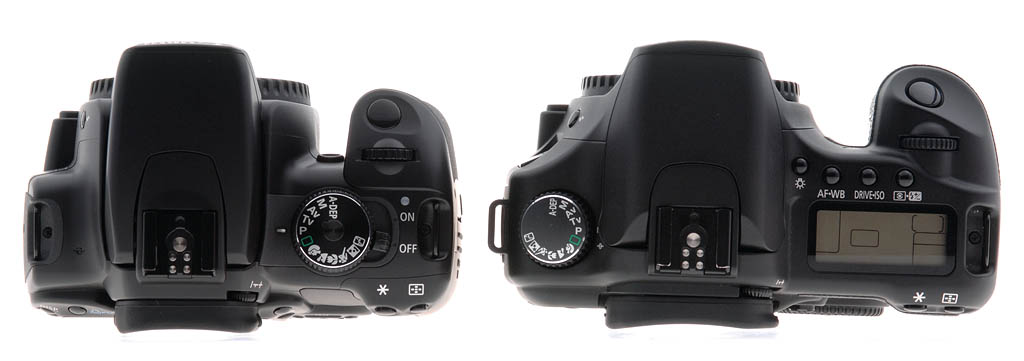
Canon EOS Digital Rebel XTi vs Canon EOS 30D
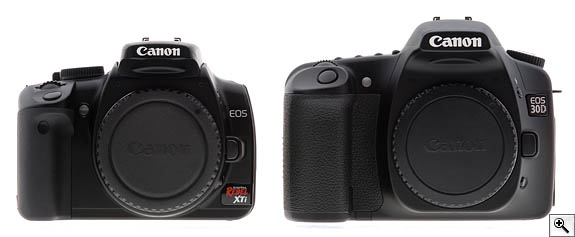
Even smaller: The difference becomes more dramatic when the Rebel XTi is compared with its big brother, the Canon EOS 30D. You can see the significant difference in grip size in both the front and top shots on both the D80 in the photos above and in the 30D here.
Canon EOS Digital Rebel XTi vs Nikon D40
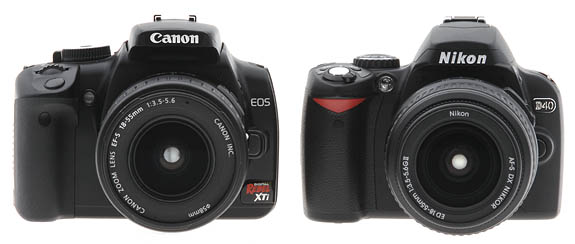
Turning tables: The 10 megapixel Canon Rebel XTi now looks large next to the new 6 megapixel Nikon D40. Both are quite comparable in the hand, however, with the D40 offering a little more room for all four fingers on the grip.
First Test Shots! September 8, 2006, 12:33 am. We can finally post some test shots for the Canon Digital Rebel XTi. We ran it through our full suite of new test targets, which tells a pretty good story about this new 10.1 megapixel camera's capabilities. The lens, however, is not really equal to the high resolution of this camera, so tonight I took some indoor gallery shots with the Canon EF-S 60mm f/2.8, a very sharp lens. I wasn't able to journey outdoors due to the bad weather today, but hopefully tomorrow will offer better light, and I'll be able to post quite a few more. For now, here are a few shots of my personal little models, who are very good sports when dad has to test a new camera. To see all the full set of Multi Target and Still Life shots in addition to these three, click on the Samples tab and select Thumbnails (or click here). To get the RAW versions, you'll need to click on the links below. Beware: they are between 11 and 13 megabytes each.
 |  |  |
| Prime lens test. Here are three shots, straight out of the camera with the EF-S 60mm f/2.8. Click on the images above to for the full res version. These should tell you a lot about what the Rebel XTi can do with a nice sharp lens. You can also download the CR2 (RAW) files for these shots below. Unfortunately, you may not be able to open them without the new version of Digital Photo Pro v 2.2.0.1 that comes with the new Rebel XTi. The update does not appear to be available yet on the Canon site. (I apologize for the rudimentary lighting setup; it's just a makeshift backdrop and lighting arrangement in the basement for now, used mostly in emergencies like this.) |
| NOTE: The Safari browser cannot download the CR2 files for some reason; please use Firefox or another browser. |
YIMG_8782.CR2
13.4MB | YIMG_8804.CR2
11.4MB | YIMG_8892.CR2
11.4MB |
More images posted. September 8, 2006, 3:14 pm; updated September 11. The weather did cooperate, and I managed to get a few decent gallery shots around a nearby town today. I plan to head out for more, mostly because I've been dissatisfied with the 18-55mm kit lens that Canon sent along. It's not a new lens that came with the body, but a well-used one. The first rack of Multi Target and Still Life shots were dramatically soft in the corners, far more than I remember from other Digital Rebel cameras. It could be the higher-res sensor showing the insufficiency of the lens, but this looks worse to me. The galleries I shot show this quite dramatically around the edges, and chromatic aberration is nasty even toward the middle. The 60mm shots I took last night and today are so much better that I need to grab the other 18-55mm we have around here, which we used to test the Rebel XT way back and test that.
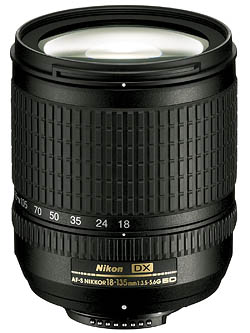
Meanwhile, we've reshot the full target set of Still Life images with the Canon EF 100mm f/2.8 Macro. Some readers have pointed out that we shot the Nikon D80 with the Nikon 105mm f/2.8 rather than its 18-135mm kit lens, which is a good point. We'll be shooting both with the kit lens and with a benchmark lens if it's available.
Finally, for those comparing the Canon EOS Digital Rebel XTi to the Nikon D80, it had been brought to our attention that we shot the ISO series of the Still Life with the Nikon D80 at high contrast. However, on closer inspection, and after a reshoot of the camera, it has become clear that the D80 was set to Auto Contrast. Since both the D80 and the Rebel XTi are consumer cameras, we elect to leave it at that. You can see the results of the ISO 100 shots for analysis of contrast and compare it to the ISO 1,600 version to satisfy yourself about how much contrast might influence the image. We want to leave it to the D80 to decide how to set the contrast, since that's what most users will do.
 |  |
 |  |
| Canon Rebel XTi | Nikon D80 |
| Both ISO 1,600 images show some noise in the shadows, and some softening due to anti-noise processing. Though the Rebel XTi images seem to hold a bit more detail, they suffer from more chroma noise (random colors) than you see in the Nikon image. You can see these effects in the top two images, especially in the shadows in the background. However, you can see a watercolor effect, or smudging in the D80 images, in both the edges of the bottle, the background shadow, and especially in the peppers in the oil jar on the bottom images. Also, the fine lines of the label in the top image are far blurrier on the D80 image. But we are talking about ISO 1,600 here, and both cameras do very well. |
Some may prefer Canon's approach to noise, because they can eliminate the blotchy chroma noise with some of the excellent noise fixing programs on the market. Some will prefer Nikon's approach, which just takes care of the noise and delivers more even color tones, despite the slight watercolor effect. Most won't notice a difference when the images are printed.
All of the artifacts I mention in both images are visible from about a foot away in 13x19 inch printed images, but not from arm's length; which is the closest most people get to such images. The XTi's somewhat softer images are better able to handle unsharp mask than are the noticably sharper D80 images, where unsharp mask enhances many of the smudgy artifacts.
It's clear that there are differences in the way the Canon XTi and the Nikon D80 deal with noise at ISO 1,600, but most impressive is that they both handle the situation very well. The 13x19 inch images we printed are surprisingly good. I think we can call the images from either camera unprecedented.
 My experience with the Rebel XTi has been positive. It offers more of what you'd seek from a higher-end camera like the Canon EOS 30D at a much lower price. It's also smaller and easier to bring along, which is no small consideration when you want quality pictures on vacation. It can't quite reach to the EOS 30D's ISO 3,200 mode (it's limited to ISO 1,600), nor does it have the benefit of 1/8,000 second shutter speed (it's limited to 1/4,000). But it has something no other EOS has: automatic dust removal and abatement technology, plus a way to digitally subtract dust when a more thorough manual cleaning isn't possible. This important technology will doubtless make it into other EOS cameras, but for now the XTi is the only self-dusting digital SLR available from Canon.
The Canon Digital Rebel XTi is an excellent take-anywhere all-purpose digital SLR, that can serve as a second camera for owners of Rebel XT, 20D, 30D, and 5D cameras who want to keep a second body with a different focal length strapped around their neck. I think serious photographers would do better with an EOS 30D for its stronger build and greater manual adaptability, but for just about everyone else, the Rebel XTi offers everything you need and more.


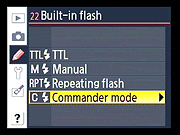 Flash. X-sync speed has been reduced from 1/500 on the D70 to 1/200 second on the Nikon D80. However, the D80's master flash control capabilities have been markedly improved, with an expanded Commander mode. Whereas the D70 could only control one group of remote or slave flashes using its built-in strobe, and couldn't add its own flash to the exposure, the Nikon D80 can control up to two groups of SB-800 and SB-600 flashes in addition to contributing to the scene. With the addition of an SB-800 flash, the D80's capabilities increase to controlling up to three groups of flashes independently, and also allows fill flash sync at up to 1/8000 second.

 I also liked the Nikon D80's Auto ISO mode, which is available in most modes, not just Full Auto. Not only is that unusual for an SLR at this level, you can set a threshold shutter speed for it to activate, and also limit how high it will automatically adjust the camera if the required shutter speed goes below, say, 1/40 second. That's smart use of digital technology.
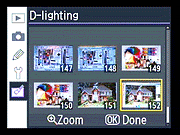 Post-capture image editing, available via the new Retouch Menu, is limited to one adjustment per type of adjustment, but can include a combination of tinting and cropping, for example. Other options include several Coolpix favorites, like D-lighting, to improve shadow and highlight detail, and heretofore-unaddressed essentials like Red-eye correction are now possible in the camera. Changes are not applied to the original image, so you can make several versions with different changes to see what you like, and still have the original to edit later on the computer. You can also combine two images with Image overlay, a feature that first appeared on the D2X.
 Color balance is among the more interesting filters (skipping right past Skylight and Warm filter). While Nikon didn't put this tool to use like Canon does to set and bracket white balance, they did put it here where you can fix images post-capture using the two-axis color chart. Regrettably, you can't use the resulting settings to set a white balance once you've achieved it. Could be patents, perhaps, but the Color balance filter is quite useful to fix a worthy shot if you forgot to set the proper white balance; then you can go back and use the conventional tools to white balance the shot properly.
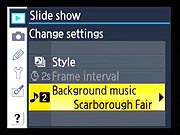 Slideshows. Another Coolpix feature to make the jump to the Nikon D80 is the more elaborate Pictmotion Slideshow, which can include music in the mix. The music selection is limited to a handful of well-known songs. It's good they're well known, too, because you can't actually hear the music you've chosen from the D80 as the camera has no built-in speaker; but hook it up to a TV via the included AV cable, and you'll have nice musical accompaniment to your effects-driven slideshow. While this functionality falls under the "nice but non-essential" category, it begs the question why more cool features that have grown up in the digital all-in-one camera aren't included on today's crop of digital SLRs. Nikon has thrown down, so we'll see if the other majors will have time to react to this consumer-friendly move for the upcoming holiday season. Even if the consumer never uses any of it, it'll wow them at the sales counter for sure. Maybe the next version will include that speaker they're missing to complete the package.
